Servo motor speed control Arduino with 2 circuits.
Program the Arduino to control the position and speed of the servo motor. Servo motor connection with Arduino, code, and video.
1. Working principle of servo motor
The servo motor consists of a small DC motor connected to the gearbox to increase the output torque. A potentiometer is connected to the output shaft to convert to a feedback signal.
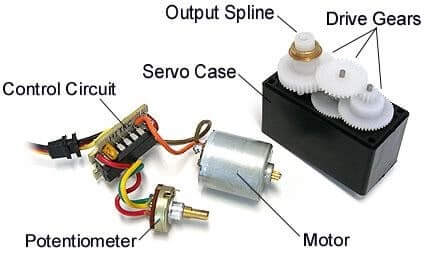
Structure of servo motor (Source: tutorial.cytron.io)
Working principle: When the motor rotates, the output position is measured by the potentiometer and is continuously compared with the control command. Any difference gives rise to an error signal in the appropriate direction, which drives the electric motor forwards or backward, and moves the output shaft to the commanded position. When the servo reaches this position, the error signal reduces and then becomes zero, and the servo will stop moving.
Servo motors are designed with a limited rotation angle from 0 to 180 degrees. Therefore, the motor speed control is different from other motors.
2. Servo motor speed control Arduino (Sweep)
In this example, we will sweep the shaft of the servo motor back and forth across 180 degrees. When the servo motor rotates from 0 degrees to 180 degrees, the motor rotates at a fast speed. When the motor reverses from 180 degrees to 0 degrees, the motor rotates at a slower speed.
2.1 Servo motor connection with Arduino
In this circuit, the servo motor will connect three wires to the Arduino.
+ The yellow wire of the servo motor is the signal wire. This wire will connect to pin 9 of the Arduino.
+ The red and brown wires are the power supply wires of the servo motor. The red wire connects to the 5V source; the brown wire connects to the GND of the Arduino.
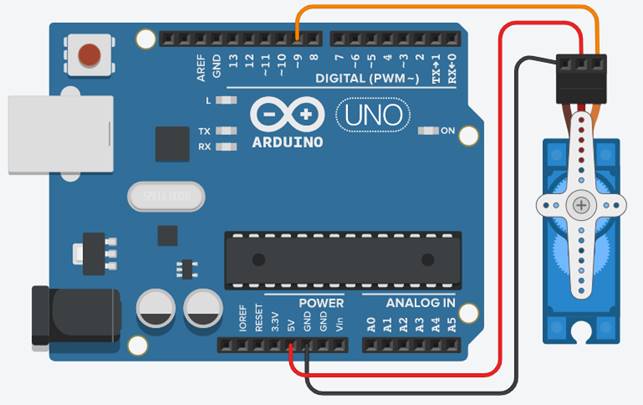
Servo motor connection with Arduino
2.2 Arduino program
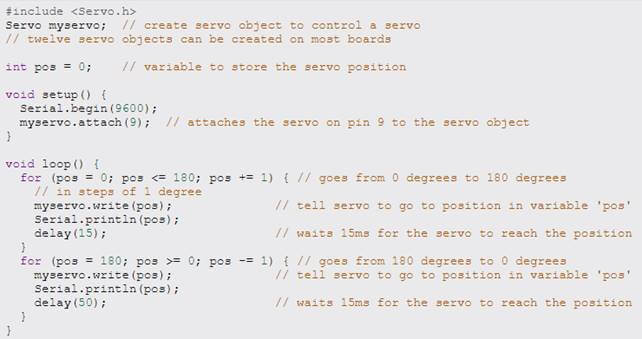
#include <Servo.h>
Servo myservo; // create servo object to control a servo
int pos = 0; // variable to store the servo position
void setup() {
myservo.attach(9); // attaches the servo on pin 9 to the servo object
}
void loop() {
for (pos = 0; pos <= 180; pos += 1) { // goes from 0 degrees to 180 degrees
// in steps of 1 degree
myservo.write(pos); // tell servo to go to position in variable ‘pos’
delay(15); // waits 15ms for the servo to reach the position
}
for (pos = 180; pos >= 0; pos -= 1) { // goes from 180 degrees to 0 degrees
myservo.write(pos); // tell servo to go to position in variable ‘pos’
delay(50); // waits 50ms for the servo to reach the position
}
}
2.3 Video: Servo motor speed control.
In the simulation circuit with the application “Tinkercad”, I will additionally use the Serial.println() to view the instantaneous position value of the servo motor.
Application simulation program: Servo motor speed control Arduino
>>> Simulation video with Tinkercad software
3. Arduino controls position of servo motor with potentionmeter
In this example, we will use the potentiometer to control the servo motor position. The original idea is that when we change the potentiometer value, the Arduino will reference this value and drive the motor to the desired position.
3.1 Wiring diagram
In this example, I will use a potentiometer connected to the Arduino.
+ The middle pin of the potentiometer connects to the A0 pin of the Arduino
+ The other two pins of the potentiometer connects to the 5V and GND of the Arduino (regardless of the order).
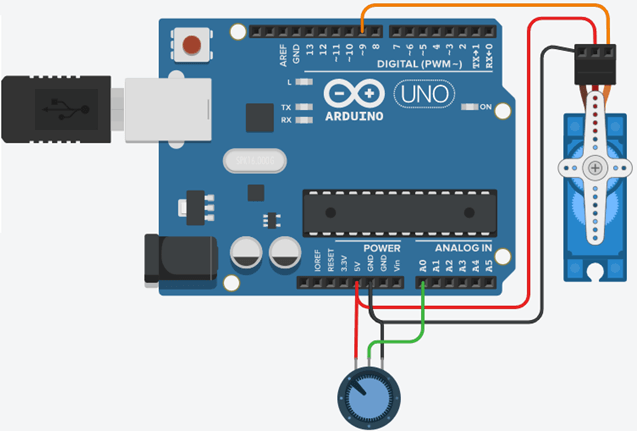
Servo motor connection with Arduino
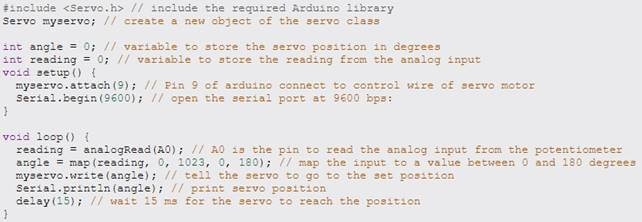
3.2 Code
#include <Servo.h> // include the required Arduino library
Servo myservo; // create a new object of the servo class
int angle = 0; // variable to store the servo position in degrees
int reading = 0; // variable to store the reading from the analog input
void setup() {
myservo.attach(9); // Pin 9 of arduino connect to control wire of servo motor
}
void loop() {
reading = analogRead(A0); // A0 is the pin to read the analog input from the potentiometer
angle = map(reading, 0, 1023, 0, 180); // map the input to a value between 0 and 180 degrees
myservo.write(angle); // tell the servo to go to the set position
delay(15); // wait 15 ms for the servo to reach the position
}
3.3 Video: servo motor position control
In the simulation video I will use Serial.println() to display the position value of the motor. Therefore, when we change the rheostat, we see that this value also changes.
Servo motor position control with potentiometer
>>> Simulation video with Tinkercad software
>>> Related Posts
Arduino uno control servo with photoresistor -Wiring, code, video
Center tapped full wave rectifier circuit (7 circuit diagrams)
4 star delta starter control circuit diagrams with PLC, Timer,…