In the previous post, we learned about an example: analog read serial using Arduino. This article will show Digital read serial Arduino, using Arduino to read the state of a button and send data to the computer.
1. Cirduit diagram
The wiring diagram includes three wires. 5V power supply connect to 10k resistor (pull-up resistor). Another pin of the pull-up resistor connects to the push button and connects to pin 3 of the Arduino. Another pin of the pushbutton is connected to GND.
We can also use Arduino’s internal pull-up resistor by declaring pin 3 to use the pull-up resistor.
(pinMode(3, INPUT_PULLUP);).
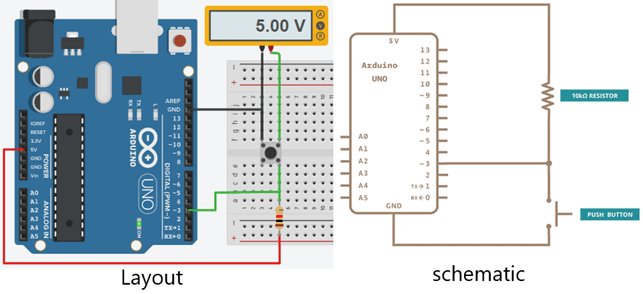
Digital read serial example using Arduino (Tinkercad)
In the figure above, a voltage meter is used to determine the state of the button.
+ When we press the button, the resistor and pin 3 will connect to GND. Therefore the meter shows 0V.
+ When we do not press the button, pin 3 is connected to the 5V power source (through the pull-up resistor). Therefore the meter shows 5V.
2. Digital read serial arduino code
We will use the Serial.begin function to set the communication speed between the Arduino and the computer to 9600. Use the pinMode function to declare pin 3 as the read signal of the button.
In the main program, we use the digitalRead function to read the state of the button.
+ The return value of this function is 1 if the voltage at pin 3 is 5V.
+ The return value of this function is 0 if the voltage at pin 3 is 0V.
The return value of the digitalRead function is assigned to the buttonState variable. Then we use the Serial.println function to print the value of the buttonState variable to the computer. To see the value of this variable on the computer, we can turn on the Serial Monitor window on the Arduino IDE software.
Digital read serial program using Arduino:
// digital pin 3 has a pushbutton attached to it.
int pushButton = 3;
// the setup routine runs once when you press reset:
void setup() {
// initialize serial communication at 9600 bits per second:
Serial.begin(9600);
// make the pushbutton’s pin an input:
pinMode(pushButton, INPUT);
}
// the loop routine runs over and over again forever:
void loop() {
// read the input pin:
int buttonState = digitalRead(pushButton);
// print out the state of the button:
Serial.println(buttonState);
delay(1); // delay in between reads for stability
}
3. Video simulation
>>> Related posts
DC motor speed control using Arduino – diagram, principle, video
L298n motor driver connection with arduino
Led blinking using arduino (4 Examples) with code, circuit and video