Today’s article will present an Arduino serial example to display input analog that reads from a potentiometer connected to Analog pin A0.
Arduino serial example display input voltage on IDE software
1. Circuit diagram and working principle
Connect the three pins of the potentiometer to the Arduino shown in the figure. The first pin will connect to the GND of the Arduino. The middle pin of the potentiometer is connected to analog input pin A0. The 3rd pin connects to the 5V power pin of the Arduino.
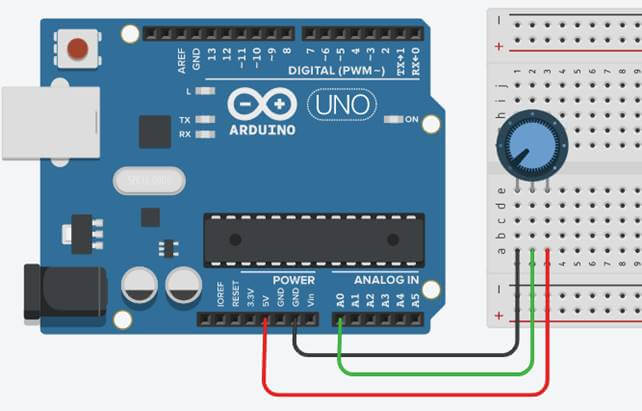
Arduino serial example to display input voltage
As we all know, when we turn the shaft of the potentiometer, the resistance value of the middle pin with the other two legs will change.
The figure below is the equivalent diagram of a potentiometer connected to 5V power. When we turn the shaft of the potentiometer, the voltage at the middle pin will change. The output voltage Vout will vary from 0 – 5V depending on the shaft position of the potentiometer.
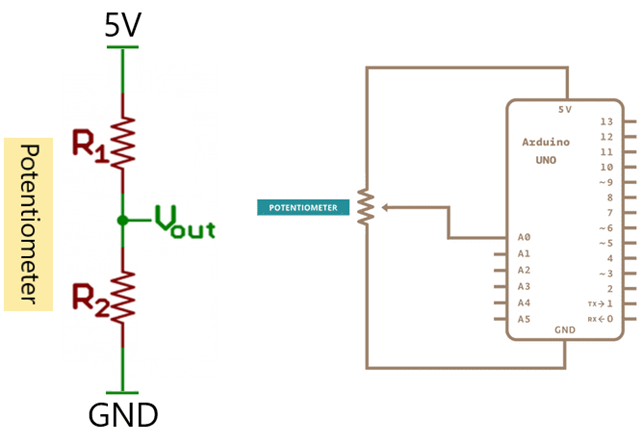
Connect potentiometer to Arduino (schematic diagram)
Arduino uses analog pin A0 to read voltage values 0 -5V from the potentiometer. The analogRead function returns a value from 0 – 1023 corresponding to the voltage applied to pin A0.
2. Code on IDE Software
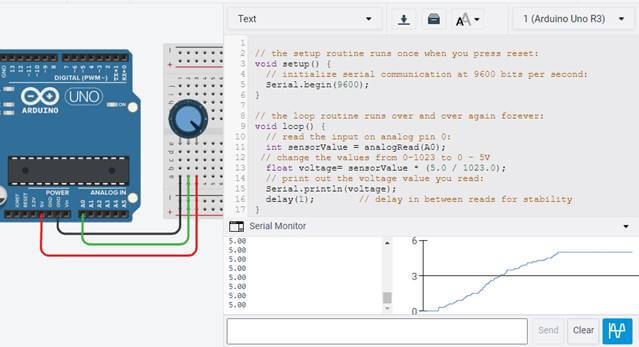
Arduino serial example simulated on tinkercad
In the program below, the first thing we need to do in the setup function is to set the communication speed between the Arduino and the computer to 9600 bit/s.
Serial.begin(9600);
Next, in the main loop of the code, we will declare a variable sensorValue to read the voltage value at pin A0. The data type of this variable is integer; the value of this variable will be from 0 to 1023.
int sensorValue = analogRead(A0);
To convert the value of the sensorValue variable from 0 – 1023 into a voltage value (data type is float) corresponding to 0 – 5V we do a little math as follows:
float voltage= sensorValue * (5.0 / 1023.0);
Finally, the program will print the voltage value read from the potentiometer to the Serial window of the Arduino IDE software with the function Serial.println(voltage);
// the setup routine runs once when you press reset:
void setup() {
// initialize serial communication at 9600 bits per second:
Serial.begin(9600);
}
// the loop routine runs over and over again forever:
void loop() {
// read the input on analog pin 0:
int sensorValue = analogRead(A0);
// Convert the analog reading 0 – 1023 to a voltage 0 – 5V
float voltage= sensorValue * (5.0 / 1023.0);
// print out the voltage value you read:
Serial.println(voltage);
delay(1); // delay in between reads for stability
}
>>> Simulation video
>>> Related Posts
Arduino uno control servo with photoresistor
Servo motor speed control arduino with 2 circuits