The LED blinking project using Arduino is the simplest program that you should run to to test whether your Arduino is working and configured correctly. Today’s article will present 4 applications to control LED blinking.
Led blinking using Arduino (4 circuit diagrams)
1. Control Led pin 13 blinking
This example is the most basic blinking led circuit. Controlling an LED connected to the 13 pins is already available on the Arduino board.
+ Circuit diagram
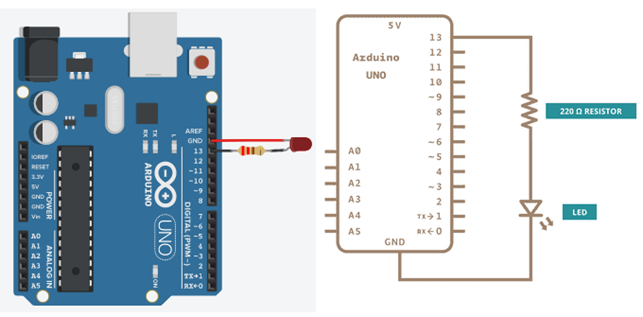
The picture below is the Arduino connection diagram with an external led. The anode of the led connects to the resistor, and the resistor connects to pin 13 of the Arduino. The cathode of the led is connected to the GND pin of the Arduino.

Circuit diagram of led blinking using Arduino
+ Code
First, the program will use the pinMode function to declare pin 13 as an output pin. Next, use the digitalWrite function to control the led on or off. The delay function is used to delay the program for a specific time and then execute the next instructions.
// the setup function runs once
void setup() {
// initialize digital pin 13 as an output.
pinMode(13, OUTPUT);
}
// the loop function runs over and over again forever
void loop() {
// turn the LED on (HIGH is the voltage level)
digitalWrite(13, HIGH);
delay(1000); // wait for a second
// turn the LED off by making the voltage LOW
digitalWrite(13, LOW);
delay(1000); // wait for a second
}
2. Three leds blink
The circuit uses three output pins 11, 12, and 13 of the Arduino to control three LEDs blinking. The connection diagram is similar to that in the example above. You can also refer to the connection diagram in the simulation video below.
// the setup function runs once
void setup() {
// initialize digital pin 11, 12, 13 as an output.
pinMode(11, OUTPUT);
pinMode(12, OUTPUT);
pinMode(13, OUTPUT);
}
// the loop function runs over and over again forever
void loop() {
// turn the LED on
digitalWrite(11, HIGH);
digitalWrite(12, HIGH);
digitalWrite(13, HIGH);
delay(1000); // wait for a second
// turn the LED off
digitalWrite(11, LOW);
digitalWrite(12, LOW);
digitalWrite(13, LOW);
delay(1000); // wait for a second
}
>>> Simulation video: Arduino controls blinking of three leds
3. Arduino blink led 5 times
In this example, we will control a red led to blink 5 times using Arduino. Then the red led will turn off, and the yellow led turns on to indicate the end of the program. Red led connected to pin 13; yellow led connected to pin 12 (refer to the circuit diagram in simulation video below).
In the setup function, we declare a subroutine called blink5times. The main program will not use any statements.
In the blink5times subroutine, we use For function to repeat the control functions to turn the red led on and off five times. Then turn on the yellow led to indicate the end of the program.
// the setup function runs once
void setup() {
// initialize digital pin 12, 13 as an output.
pinMode(12, OUTPUT);
pinMode(13, OUTPUT);
blink5times();
}
// the loop function runs over and over again forever
void loop() {
//
}
void blink5times(){
for (int i=0; i<5; i=i+1){
digitalWrite(13, HIGH); // turn the LED on
delay(500); // wait for a half second
digitalWrite(13, LOW); // turn the LED off
delay(500); // wait for a half second
}
digitalWrite(12, HIGH); // turn the yellow LED on
}
>>> Simulation video: led blinking circuit 5 times using Arduino
4. Blink without delay
Sometimes you need to do two things at once. For example, you may want to blink the LED during a reading when a button is pressed. In this case, you cannot use delay() because Arduino pauses your program during the delay(). If the button is pressed while the Arduino is pausing, your program will miss the button press.
In the example of controlling three LEDs above, when using delay(), we cannot control each led independently. The following example will control two LEDs to blink independently, without delay().
// constants won’t change. Used here to set a pin number:
const int yellowLED = 12 ;
const int redLED = 13 ;
// Variable holding the timer value so far. One for each “Timer”
unsigned long yellowLEDtimer = 0 ;
unsigned long redLEDtimer = 0 ;
// Variable to know what the current LED state is
int yellowLEDState = LOW ;
int redLEDState = LOW ;
void setup() {
pinMode (yellowLED,OUTPUT) ;
pinMode (redLED,OUTPUT) ;
yellowLEDtimer = millis () ;
redLEDtimer = millis () ;
}
void loop() {
// check if it is time to change state
// state of red led will be changed after half a second
if ( (millis () – yellowLEDtimer) >= 500 ) {
if (yellowLEDState == LOW) //Check the current led state
yellowLEDState = HIGH ;
else
yellowLEDState = LOW ;
// Write new state for red led
digitalWrite (yellowLED, yellowLEDState ) ;
yellowLEDtimer = millis () ; // Reset timer
}
// The other LED is controlled the same way. Repeat for more LEDs
// state of red led will be changed after a second
if ( (millis () – redLEDtimer) >= 1000 ) {
if (redLEDState == LOW)
redLEDState = HIGH ;
else
redLEDState = LOW ;
// Write new state for yellow led
digitalWrite (redLED, redLEDState ) ;
redLEDtimer = millis () ; // Reset timer
}
}
>>> Simulation video: Led blinking using Arduino without delay
>>> Related Posts
L298n motor driver connection with arduino
DC motor speed control using arduino